参考https://blog.csdn.net/lovehuangjiaju/article/details/48661847
Spark SQL简介
Spark SQL是Spark的五大核心模块之一,用于在Spark平台上处理结构化数据,利用Spark构建大数据平台上的数据仓库具有如下特点:
- 能够无缝将SQL语句继承到Spark应用程序当中
- 提供统一的数据访问方式(包括Hive,Avro,Parquet,ORC,JSON,和JDBC)
- 兼容Hive
- 可采用JDBC或ODBC连接
Spark SQL运行框架
传统的关系型数据库
当我们提交一个简单的查询语句:SELECT a1,a2,a3 FROM tableA Where condition

该语句是有Projection(a1, a2, a3), Data Source(tableA), Filter(condition) 组成,分别对应sql查询过程中的Result,Data Source,Operation。实际上就是按照Result->Data Source->Operation的次序来描述的。在SQL实际运行过程中,一般数据库会先通过SQL query来解析语句中的关键词,然后按照Operation->Data Source->Result的次序来执行。
所有的这些操作都和Tree有关,在数据库Parse(解析)一个SQL语句的时候,会将SQL语句转换成一个树形结构(Tree)来进行处理。
Spark SQL的Tree和Rule
Spark SQL对SQL语句的处理和关系型数据库对SQL语句的处理采用类似的方法,先对SQL语句进行解析(Parse),然后形成一个Tree,在后续的绑定、优化等处理过程中都是对Tree进行操作,而操作的方法次用Rule,通过模式匹配对不同类型的节点采用不同的操作。
Data Frame
在Spark中,DataFrame是一种以RDD为基础的分布式数据集,DataFrame带有schema元信息,即DataFrame所表示的表数据集的每一列都带有名称和类型,它对于数据的内部结构具有很强的描述能力。因此Spark SQL可以对藏于DataFrame背后的数据源以及作用于DataFrame之上的变换进行针对性的优化,最终达到大幅提升运行时效率。
Data Frame具有如下特点:
(1)单机KB级到集群PB级的数据处理
(2)支持多种数据格式和存储系统
(3)通过Spark SQL Catalyst优化器可以进行高效的代码生成和优化
(4)提供Python,Java,Scala语言的API
Data Frame 与 RDD 的区别
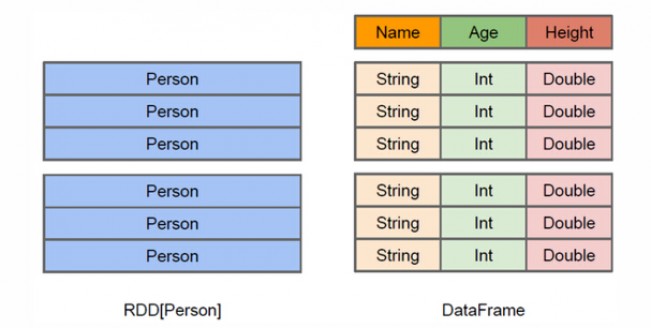
RDD是分布式的Java对象集合。比如RDD[Person]是以RDD为类型参数,但是,Person类的内部结构对RDD而言是不可知的。DataFrame是Java以RDD为基础的分布式数据集,也就是分布式的Row对象的集合(每个Row对象代表一行记录),提供了详细的结构信息,也就是我们经常说的模式(schema),Spark SQL可以清楚地知道该数据集中包含哪些列、每列的名称和类型。
和RDD一样,DataFrame的各种变换操作也采用惰性机制,只是记录了各种转换的逻辑转换路线图(是一个DAG图),不会发生真正的计算,这个DAG图相当于一个逻辑查询计划,最终,会被翻译成物理查询计划,生成RDD DAG,按照之前介绍的RDD DAG的执行方式去完成最终的计算得到结果。
从RDD转化成DataFrame
Spark提供了两种模式从RDD转化为DataFrame
利用反射机制来推断包含特定类型对象的RDD的schema,适用于对已知数据类型的转换
1
2
3
4
5
6
7
8
9
10
11
12
from pyspark.shell import sc, spark
from pyspark.sql.types import Row
peopleRDD = sc.textFile("file:///usr/local/spark-2.4.3-bin-hadoop2.7/examples/src/main/resources/people.txt")
peopleDF = peopleRDD.map(lambda line: line.split(',')).map(lambda x: Row(x[0], x[1])).toDF()
peopleDF.createOrReplaceTempView("people")
results = spark.sql("select * from people")
personsDF = results.rdd.map(lambda x: "name: " + x[0] + ", age:" + x[1]).foreach(print)使用编程接口,构造一个schema将其应用在已知的RDD上
1 | from pyspark.shell import sc, spark |
将RDD保存为文件
第一种方法read.format和write.format。write.format()支持输出 json,parquet, jdbc, orc, libsvm, csv, text等格式文件。如果要输出文本文件,可以采用write.format(“text”),但是,需要注意,只有select()中只存在一个列时,才允许保存成文本文件,如果存在两个列,比如select(“name”, “age”),就不能保存成文本文件。
1
2
3
>>> peopleDF = spark.read.format("json").load("file:///usr/local/spark/examples/src/main/resources/people.json")
>>> peopleDF.select("name", "age").write.format("csv").save("file:///usr/local/spark/mycode/newpeople.csv")第二种方法 rdd.saveAsTextFile
1
2
>>> peopleDF = spark.read.format("json").load("file:///usr/local/spark/examples/src/main/resources/people.json"
>>> peopleDF.rdd.saveAsTextFile("file:///usr/local/spark/mycode/newpeople.txt")
通过JDBC连接数据库 , DataFrame
建立一个Mysql关系型数据库
1 | drop database if exists spark; |
下载JDBC驱动
在启动pyspark的同时加载JDBC驱动
1
pyspark --jars //usr/local/spark-2.4.3-bin-hadoop2.7/jars/mysql-connector-java-8.0.16.jar --driver-class-path //usr/local/spark-2.4.3-bin-hadoop2.7/jars/mysql-connector-java-8.0.16.jar
通过jdbc来读取数据
依然是通过read.format进行读取,每一个option对应jdbc读取的配置。1
2
3
4
5
6
7
8
9>>> jdbcDF = spark.read.format("jdbc").option("url", "jdbc:mysql://localhost:3306/spark").option("driver", "com.mysql.jdbc.Driver").option("dbtable", "student").option("user", "root").option("password", "shaoguoliang").load()
Loading class `com.mysql.jdbc.Driver'. This is deprecated. The new driver class is `com.mysql.cj.jdbc.Driver'. The driver is automatically registered via the SPI and manual loading of the driver class is generally unnecessary.
>>> jdbcDF.show()
+---+--------+------+---+
| id| name|gender|age|
+---+--------+------+---+
| 1| Xu Nan| F| 24|
| 2|Xue Huan| M| 19|
+---+--------+------+---+通过jdbc来写数据库
1 | # coding=utf-8 |
与Hive的连接
- 测试安装的spark版本是否支持hive如果成功导入包,说明支持
1
2
3
4
命令行pyspark
from pyspark.sql import HiveContext
或者scala命令行 spark-shell
import org.apache.spark.sql.hive.HiveContext - 在Hive中创建数据库和表
- 启动mysql
- 启动hadoop,
start-all.sh(启动成功的标志是在jps命令下能够看到Master和DataNode进行) - 启动hive,
$HIVE_HOME/bin/hive(启动成功标志是看到了hive>命令行) - 成功启动mysql, hadoop, hive后,进入hive,创建一个新的数据库sparktest并创建一个数据表student,并记录两条数据
1
2